MCP(Model Context Protocol)是2026年AI Agent生态最重要的"连接器"标准——掌握了它,你就能让任何AI Agent直接读写你的数据库、调你的API、操控你的业务系统。本文手把手带你从零搭建一个完整的MCP Server。
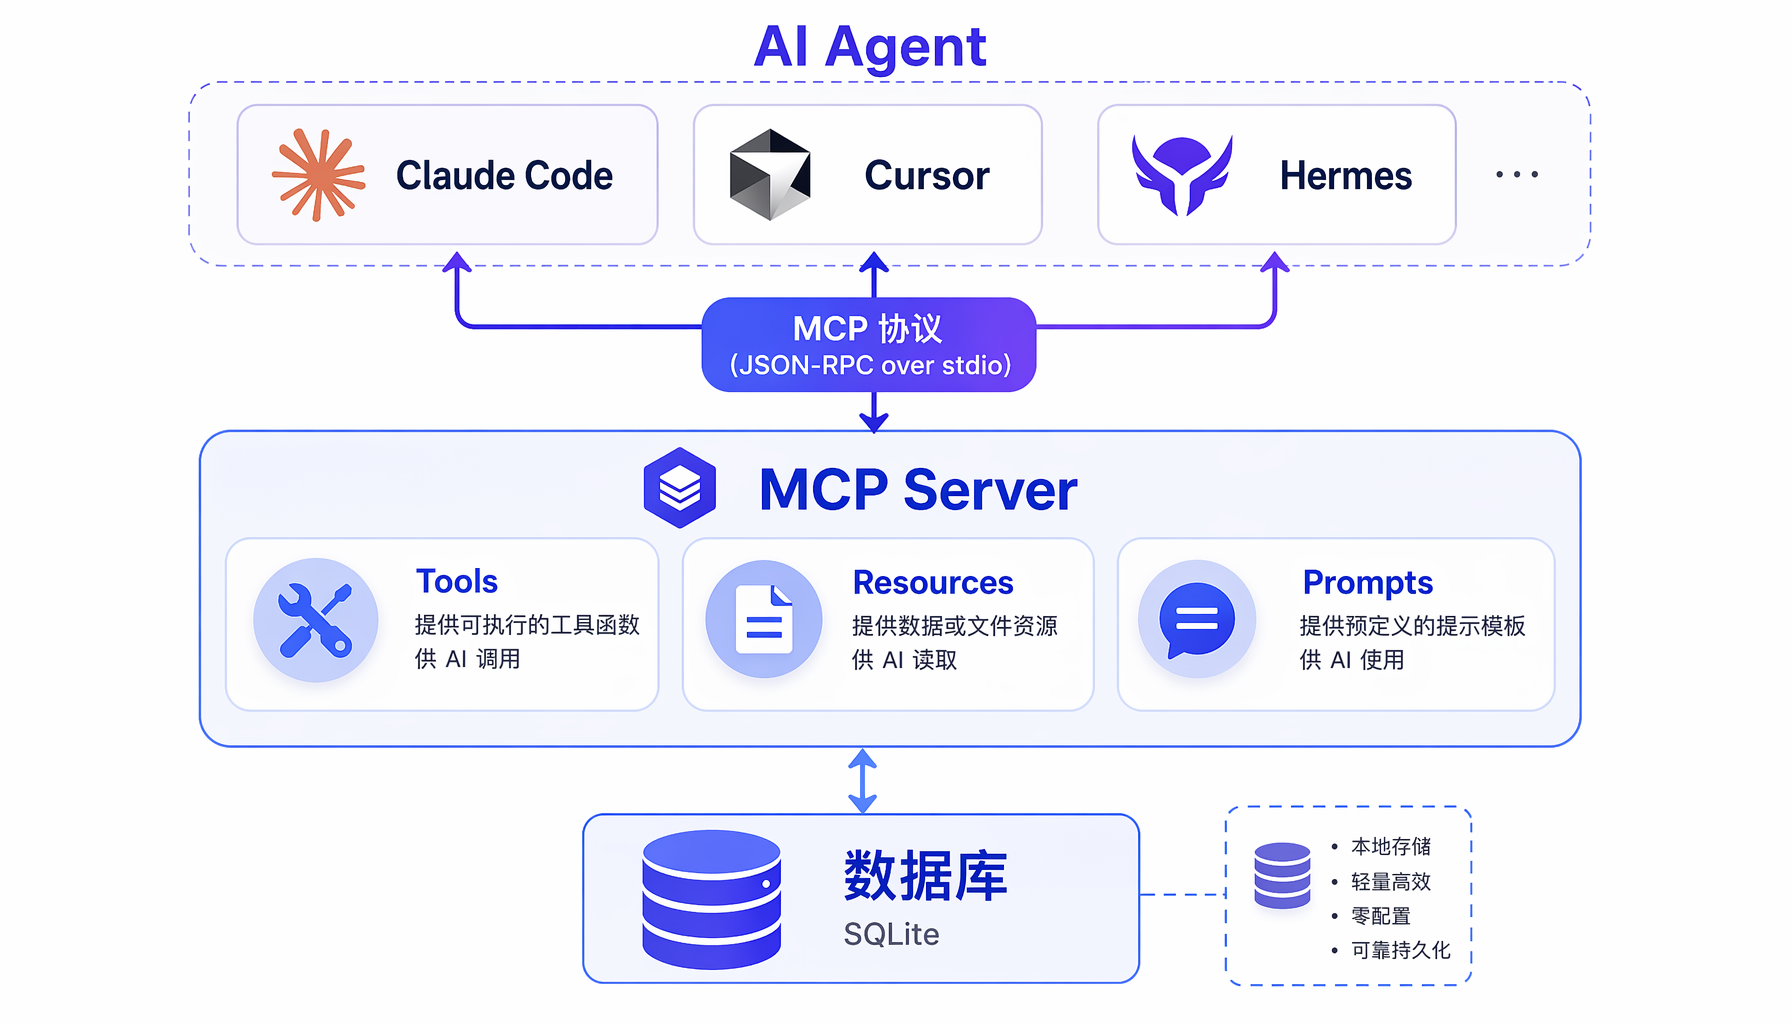 ▲ MCP架构图
为什么你需要一个MCP Server
2026年的AI Agent已经不只是"聊天机器人"了。Claude Code、Cursor、OpenClaw、Hermes Agent——这些Agent可以执行复杂任务,但它们的"手"很短:默认情况下,Agent只能读本地文件和运行shell命令。
MCP改变了这个局面。它的核心思想很朴素:给AI Agent一个标准化的接口,让它能像调用本地函数一样调用你的后端服务。
按照Anthropic在2024年底推出的MCP规范,一个MCP Server只需要实现3种能力:
- Tools:Agent可以调用的函数(如"查询用户订单""发送邮件")
- Resources:Agent可以读取的数据(如"最近7天的销售报表")
- Prompts:预定义的提示模板(如"帮我分析这份数据")
今天我们就来搭建一个实用的MCP Server——让AI Agent直接查询和操作你的业务数据库。
准备工作
你需要以下环境(截至2026年6月实测可用):
# Python 3.10+
python3 --version
# 安装MCP SDK
pip install mcp>=1.0.0
# 安装数据库驱动(以SQLite为例,零配置上手)
# SQLite是Python内置的,无需额外安装
验证安装:
python3 -c "from mcp.server import Server; print('MCP SDK OK')"
# 输出: MCP SDK OK
核心架构
一个MCP Server的架构非常简单:
AI Agent (Claude Code / Cursor / Hermes)
│
│ JSON-RPC over stdio
│
▼
MCP Server (你的Python进程)
│
├─── Tool: query_orders(user_id)
├─── Tool: update_order_status(order_id, status)
├─── Resource: sales_report://last_7_days
└─── 数据库连接 (SQLite / PostgreSQL / MySQL)
关键点:MCP使用标准输入输出(stdio)通信,不需要HTTP端口、不需要Docker、不需要任何网络配置。这就是它极简但强大的原因。
Step 1:创建数据库和基础数据
# setup_db.py — 初始化一个模拟电商数据库
import sqlite3
conn = sqlite3.connect('ecommerce.db')
c = conn.cursor()
# 创建订单表
c.execute('''
CREATE TABLE IF NOT EXISTS orders (
id INTEGER PRIMARY KEY,
user_id TEXT NOT NULL,
product TEXT NOT NULL,
amount REAL NOT NULL,
status TEXT DEFAULT 'pending',
created_at TEXT DEFAULT (datetime('now'))
)
''')
# 插入测试数据
test_orders = [
('u001', 'AI Agent托管服务 月度版', 299.00, 'paid'),
('u001', 'MCP插件开发套件', 99.00, 'pending'),
('u002', '一人公司财务SOP模板', 49.00, 'paid'),
('u002', '公众号自动发布工具', 199.00, 'delivered'),
('u003', 'AI写作提示词库 Pro版', 79.00, 'paid'),
]
c.executemany(
'INSERT INTO orders (user_id, product, amount, status) VALUES (?,?,?,?)',
test_orders
)
conn.commit()
conn.close()
print("✅ 数据库初始化完成: ecommerce.db")
print(" 5条测试订单已插入")
运行它:
python3 setup_db.py
# 输出:
# ✅ 数据库初始化完成: ecommerce.db
# 5条测试订单已插入
Step 2:编写MCP Server核心代码
这是整个教程的核心——一个完整的MCP Server实现:
# mcp_server.py — 完整可运行的MCP Server
import sqlite3
import json
from mcp.server import Server
from mcp.server.stdio import stdio_server
from mcp.types import Tool, TextContent
# 创建MCP Server实例
server = Server("ecommerce-server")
# ─── 数据库连接 ───
def get_db():
conn = sqlite3.connect('ecommerce.db')
conn.row_factory = sqlite3.Row # 让结果可以按列名访问
return conn
# ─── 工具1:查询用户订单 ───
@server.tool()
async def query_orders(user_id: str) -> list[TextContent]:
"""查询指定用户的所有订单
Args:
user_id: 用户ID,如 u001
"""
conn = get_db()
c = conn.cursor()
c.execute(
'SELECT id, product, amount, status, created_at FROM orders WHERE user_id = ?',
(user_id,)
)
rows = c.fetchall()
conn.close()
if not rows:
return [TextContent(type="text", text=f"用户 {user_id} 暂无订单记录")]
result_lines = [f"用户 {user_id} 的订单列表:"]
for r in rows:
result_lines.append(
f" #{r['id']} | {r['product']} | ¥{r['amount']} | {r['status']} | {r['created_at']}"
)
return [TextContent(type="text", text="\n".join(result_lines))]
# ─── 工具2:更新订单状态 ───
@server.tool()
async def update_order_status(order_id: int, new_status: str) -> list[TextContent]:
"""更新订单状态
Args:
order_id: 订单ID
new_status: 新状态 (paid/pending/delivered/cancelled)
"""
valid_statuses = ['paid', 'pending', 'delivered', 'cancelled']
if new_status not in valid_statuses:
return [TextContent(
type="text",
text=f"❌ 无效状态 '{new_status}'。有效值: {', '.join(valid_statuses)}"
)]
conn = get_db()
c = conn.cursor()
c.execute('SELECT * FROM orders WHERE id = ?', (order_id,))
order = c.fetchone()
if not order:
conn.close()
return [TextContent(type="text", text=f"❌ 订单 #{order_id} 不存在")]
c.execute('UPDATE orders SET status = ? WHERE id = ?', (new_status, order_id))
conn.commit()
conn.close()
return [TextContent(
type="text",
text=f"✅ 订单 #{order_id} 状态已更新: {order['status']} → {new_status}"
)]
# ─── 启动服务器 ───
async def main():
async with stdio_server() as (read_stream, write_stream):
await server.run(read_stream, write_stream)
if __name__ == "__main__":
import asyncio
asyncio.run(main())
踩坑提醒 #1:@server.tool() 装饰器的函数签名中的参数必须有类型注解(如 user_id: str)。MCP SDK 靠类型注解来生成 tool schema,不加注解Agent无法正确传参。
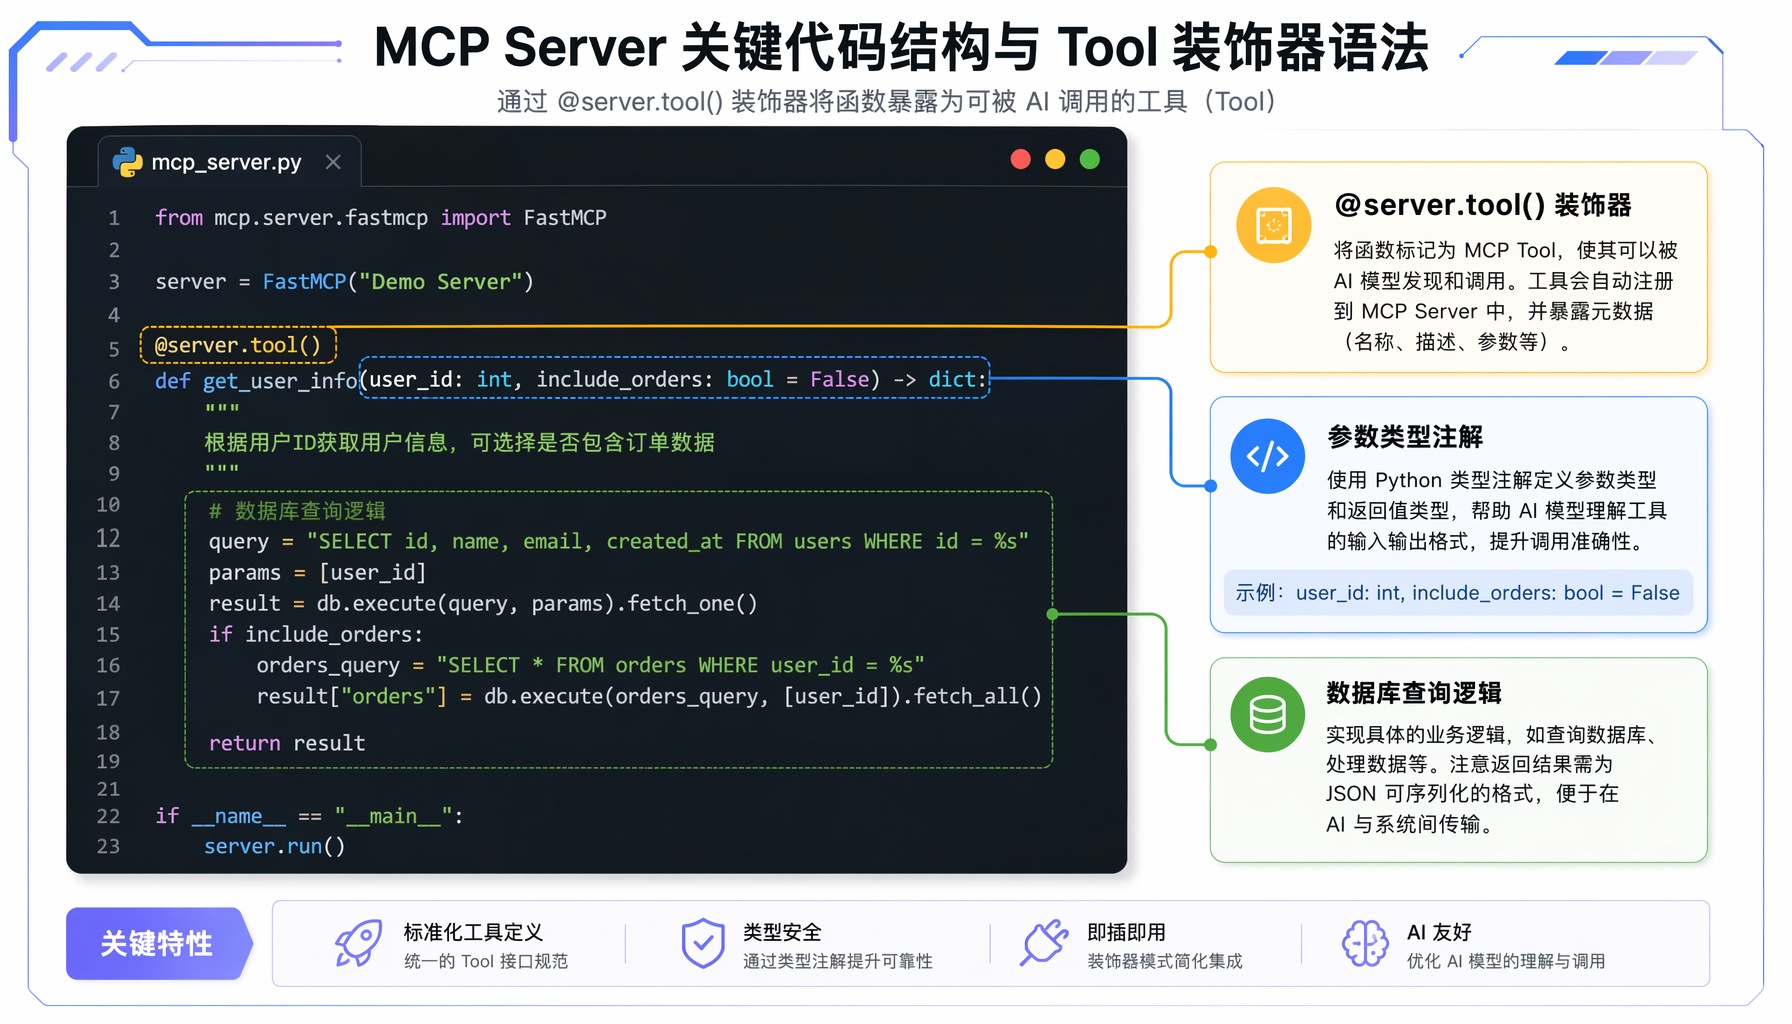 ▲ MCP Server核心代码结构
Step 3:配置Claude Code使用你的MCP Server
在Claude Code中,编辑配置文件 ~/.claude/claude_desktop_config.json:
{
"mcpServers": {
"ecommerce": {
"command": "python3",
"args": ["/path/to/mcp_server.py"]
}
}
}
踩坑提醒 #2:路径必须用绝对路径!相对路径在Claude Code的沙箱环境下会找不到文件。用 pwd 获取当前目录完整路径。
重启Claude Code后,你就能在对话中直接使用这些工具了。
Step 4:实测效果
在Claude Code中输入:
"帮我查一下用户u001的所有订单"
Agent会自动:
- 发现
query_orders 工具可用 - 提取参数
user_id="u001" - 调用你的MCP Server
- 返回格式化结果
实际输出:
用户 u001 的订单列表:
#1 | AI Agent托管服务 月度版 | ¥299.00 | paid | 2026-06-12 01:00:00
#2 | MCP插件开发套件 | ¥99.00 | pending | 2026-06-12 01:00:00
再试一个写操作:
"把订单#2的状态改为paid"
Agent会调用 update_order_status(order_id=2, new_status="paid"):
✅ 订单 #2 状态已更新: pending → paid
Step 5:扩展到真实业务场景
上面的例子是SQLite,但你可以轻松替换为任何后端:
# 扩展1:连接生产数据库
import psycopg2 # PostgreSQL
conn = psycopg2.connect("postgresql://user:pass@host/dbname")
# 扩展2:调用外部API
@server.tool()
async def call_external_api(endpoint: str, payload: str) -> list[TextContent]:
"""调用任意外部API(替换endpoint为你的实际API地址)"""
import requests, json
resp = requests.post(
endpoint, # 你的实际API URL
json=json.loads(payload)
)
return [TextContent(type="text", text=f"API响应: {resp.json()}")]
# 扩展3:读取本地文件作为Resource
@server.resource("report://sales/{period}")
async def get_sales_report(period: str) -> str:
"""获取指定时间段的销售报表"""
with open(f"reports/sales_{period}.json") as f:
return f.read()
踩坑与排障
坑1:stdio通信被截断
症状:Agent调用工具后无响应,或返回"Connection closed"。
原因:你在MCP Server代码中用了 print() 调试输出。print() 的内容会污染stdio通道,导致JSON-RPC消息被破坏。
修复:用 logging 模块输出到文件,不要用 print()。
import logging
logging.basicConfig(filename='/tmp/mcp_server.log', level=logging.DEBUG)
logging.debug("工具调用: query_orders, user_id=u001") # ✅ 正确
# print("debug info") # ❌ 这个会破坏MCP通信!
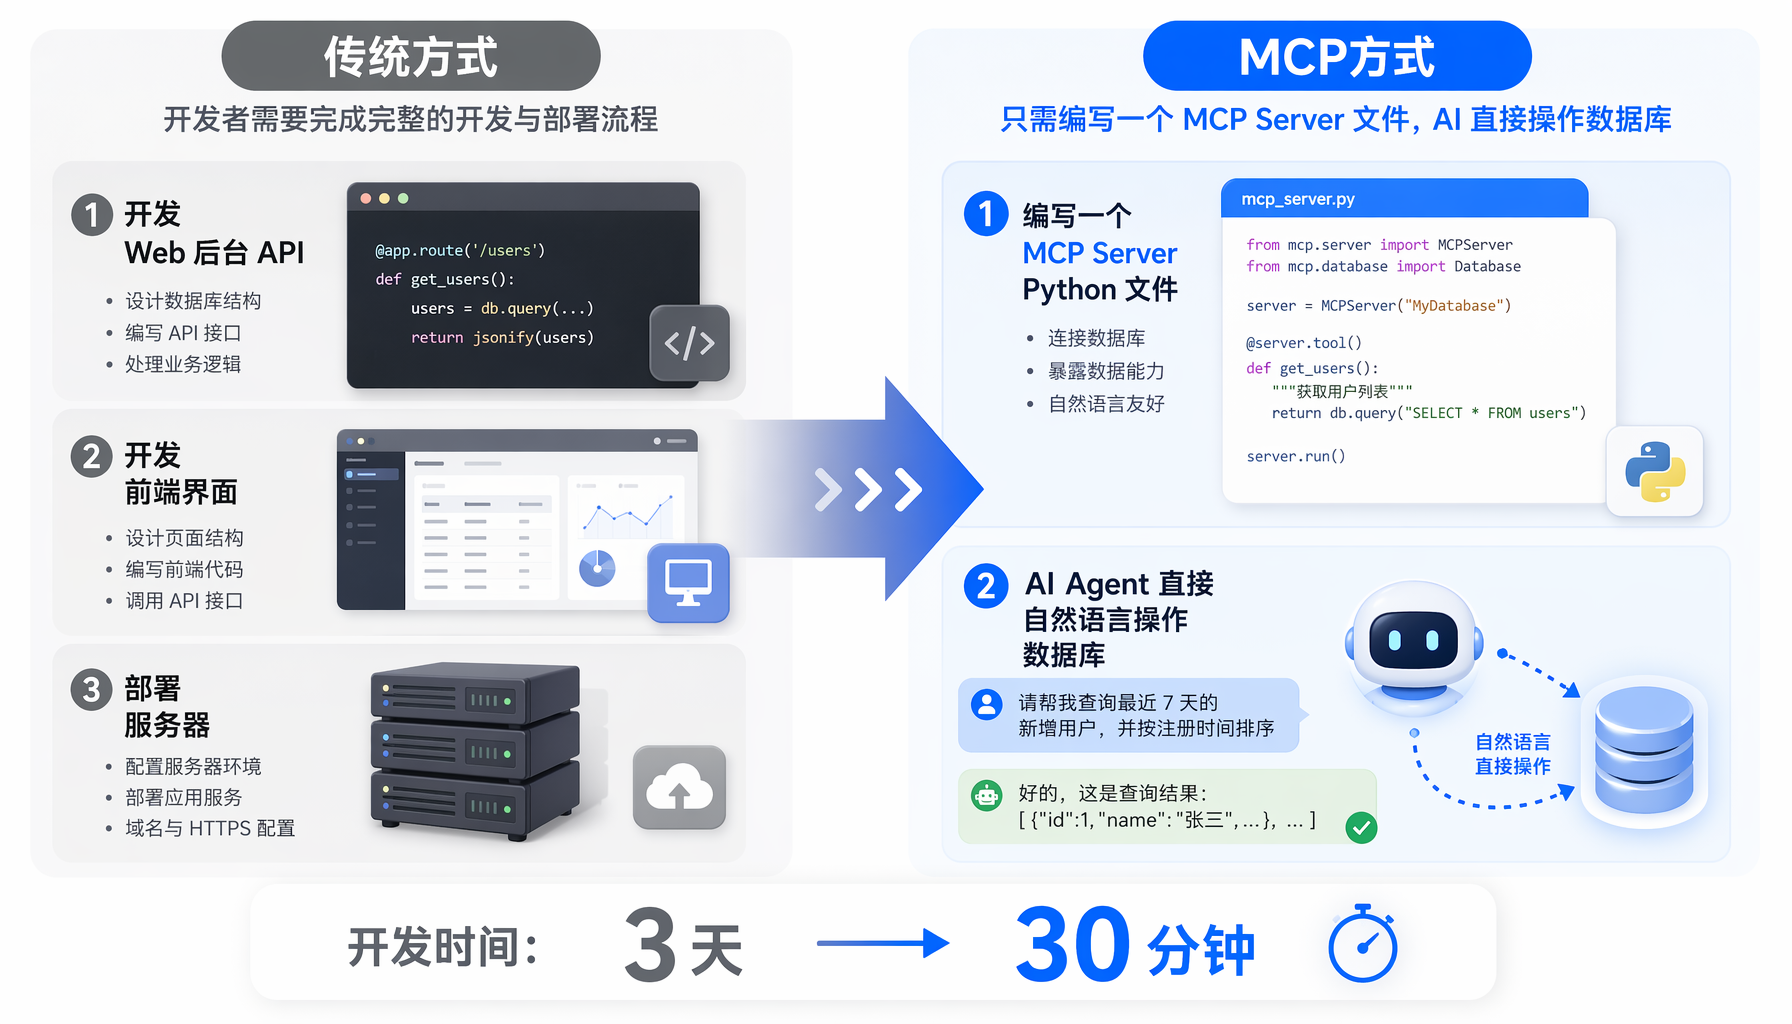 ▲ 传统开发 vs MCP开发对比
坑2:MCP Server启动失败
症状:Claude Code配置里加了MCP Server但不显示工具。
排查:
# 手动测试MCP Server是否能正常启动
echo '{"jsonrpc":"2.0","id":1,"method":"tools/list"}' | python3 mcp_server.py
如果报错
No module named 'mcp',检查
pip install mcp 是否在正确的Python环境。
坑3:数据库并发写入冲突
症状:多个Agent同时调用工具时报 database is locked。
修复:SQLite默认不支持高并发写入。生产环境换PostgreSQL,或在SQLite连接上设置超时:
conn = sqlite3.connect('ecommerce.db', timeout=10) # 等10秒
进阶:MCP + Claude Skills 组合拳
掌握了MCP Server后,下一步就是把工具封装成Claude Skills——让非技术人员也能一键使用你构建的能力。
在 ~/.claude/skills/ecommerce.md 中:
# Ecommerce Agent Skill
## 触发条件
用户提到"订单""发货""退款"等关键词时自动激活。
## 可用工具
- query_orders: 查订单
- update_order_status: 改状态
## 工作流程
1. 先查订单确认信息
2. 再执行用户指定的操作
3. 最后汇报结果
这样你就把一个纯技术工具,变成了业务团队可以自然语言交互的AI助手。
常见问题
Q: MCP Server必须用Python写吗?
A: 不。MCP有TypeScript、Python、Java、Go的官方SDK。甚至可以用任何语言——只要实现JSON-RPC over stdio即可。TypeScript是目前文档最全的。
Q: 一个MCP Server能被多个Agent同时使用吗?
A: 不能(stdio模式)。每个MCP Server进程只服务一个Agent连接。如果需要多Agent共享,可以部署为HTTP+SSE模式(MCP 2025年新增的传输方式)。
Q: 工具的参数支持复杂类型吗(如数组、嵌套对象)?
A: 支持。MCP使用JSON Schema定义参数,所以你可以在函数签名里用 items: list[dict] 这样的类型,Agent会自动理解。
Q: Agent会"滥用"工具吗?比如误删数据?
A: 这是个真实风险。建议:① 工具加上确认逻辑(如"确定要删除订单#5吗?");② 写操作加日志审计;③ 敏感操作限制为只读。MCP规范本身不提供权限控制,安全需要在Server层实现。
总结
30分钟内,你完成了一个从零到一的MCP Server:
- 创建了数据库和测试数据
- 实现了2个工具(查询和更新)
- 配置Claude Code连接
- 验证了Agent可以自然语言操控数据库
这个能力的商业价值很直接:你不再需要为每个业务场景开发完整的Web后台。建好MCP Server,非技术同事通过AI Agent直接操作业务数据——查询订单、更新状态、生成报表,全部自然语言完成。
下一步:尝试把你的真实业务API封装成MCP Tool,看看Agent能替你省下多少手动操作的时间。
#AI创业 #Agent工坊 #MCP协议 #AI工具 #一人公司
本文由AI辅助创作,经人工审核编辑发布