2026年6月3日,OpenClaw 正式移除内置的危险代码扫描器,改为 operator install policy。这不是一个简单的 API 替换,而是 AI Agent 插件安全范式的根本转变——从「厂商替你判断」到「运维者掌控一切」。
前言
如果你在生产环境跑 AI Agent,你一定遇到过这个困境:想装一个社区插件提升效率,但又担心它执行恶意代码。传统方案是内置的「危险代码扫描器」——厂商预定义一套规则,发现 eval()、exec()、subprocess 就报警拦截。
问题在于:规则永远落后于攻击者,误报率居高不下,而且你作为运维者完全无法定制判断标准。
OpenClaw v2026.6.2-beta.1(2026年6月3日发布)用 Operator Install Policy 彻底取代了这套方案。本文带你深入理解这个变化,并给出完整的生产环境配置指南。
读完本文你将获得:
- 理解 operator install policy 的架构设计和安全模型
- 掌握完整的配置流程和自定义 policy 脚本编写
- 获取一人公司生产环境的推荐配置模板
- 了解迁移路径和常见踩坑点
背景:内置扫描器为什么必须死
要理解这次变革,先看三个真实场景:
场景一:误杀合法插件。 一个社区 MCP server 插件在 package.json 的 scripts.postinstall 里调了 node ./setup.js,被内置扫描器判定为「执行任意代码」,安装直接失败。但 setup.js 只是生成本地配置文件。
场景二:漏过真正威胁。 攻击者把恶意代码藏在 npm 依赖的第 5 层 postinstall 钩子里——内置扫描器只扫插件根目录,完全看不到深层依赖。
场景三:运维者有口难言。 你的安全团队定了一套完整的「哪些操作允许、哪些拒绝」的审批流程,但内置扫描器是一刀切的黑盒——你既不能改规则,也不能绕过去。唯一的选项是关掉扫描(scan: false),然后裸奔。
这三个场景指向同一个结论:厂商预定义的静态扫描器,无法适应生产环境的动态安全需求。
PR #89516(由 @joshavant 提交)的核心洞察是:安全策略不应该是代码,而应该是运维者的决策。这正是 Operator Install Policy 的设计哲学。
核心机制:Operator Install Policy 深入拆解
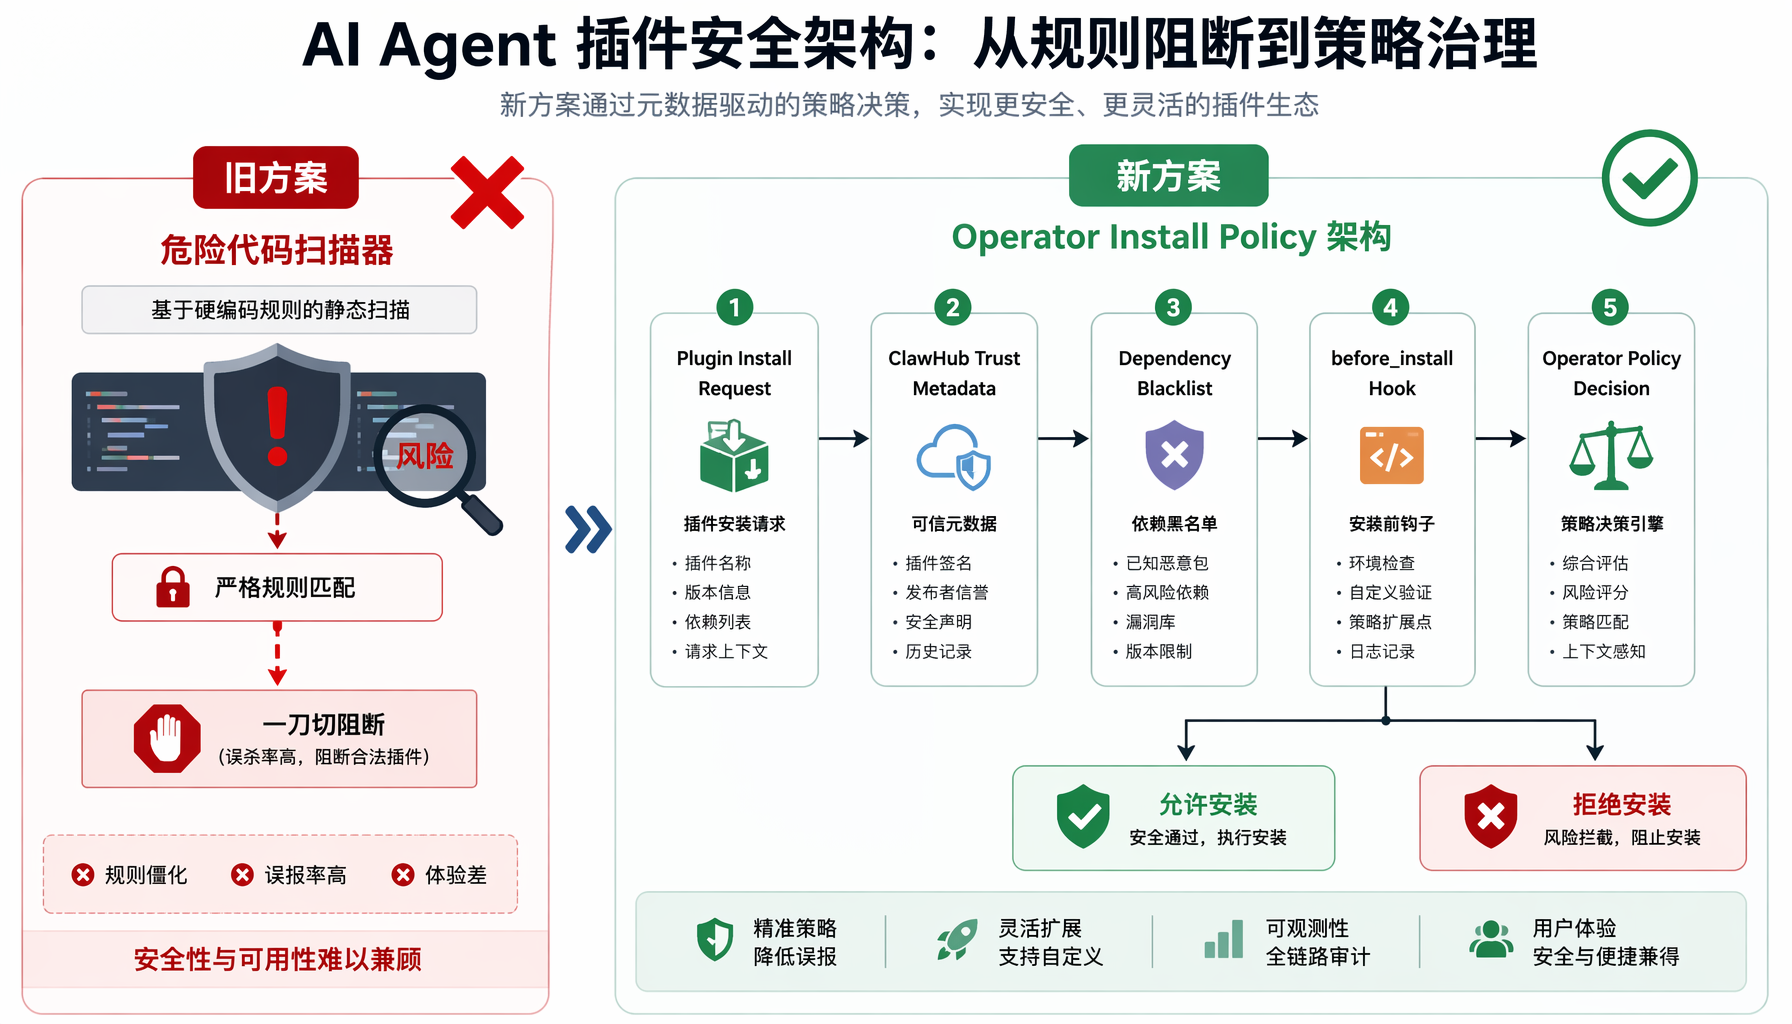
▲ 图1:AI Agent插件安全架构对比 — 从旧方案的危险代码扫描器到新方案的Operator Install Policy五层决策流程
架构总览
插件安装请求
↓
ClawHub 信任元数据(来源上下文)→ 非拦截,仅供参考
↓
插件依赖黑名单检查 → 命中即拒绝(保留的旧防线)
↓
before_install 钩子 → 插件自身的前置检查
↓
★ Operator Install Policy → 运维者自定义判断 ★
↓
批准 → 安装继续 / 拒绝 → 安装中止
关键设计原则:
- ClawHub 元数据仅供参考,本地 policy 是最终裁决者。 这意味着即使 ClawHub 标记为「已验证」,你的 policy 仍可以拒绝。
- Policy 失败时关闭(fail-closed)。 如果 policy 命令执行超时或返回异常,安装默认拒绝——宁可误拦,不可漏过。
- 危险代码扫描器完全移除。
scan: false、--dangerously-force-unsafe-install 这些旧选项虽然保留兼容(记录废弃警告),但都是 no-op——不绕过 operator install policy。
配置结构详解
在 OpenClaw 配置文件中新增 security.installPolicy 段:
security:
installPolicy:
enabled: true
targets:
- skill
- plugin
exec:
source: exec
command: /usr/local/bin/openclaw-install-policy
args:
- "--mode=production"
- "--audit-log=/var/log/openclaw/installs.log"
timeoutMs: 15000
noOutputTimeoutMs: 5000
参数说明:
| 参数 | 类型 | 说明 |
|---|
enabled | boolean | 总开关。true 时必须有有效的 exec 配置 |
targets | string[] | 强制执行的目标类型:skill 和/或 plugin。省略则所有类型都强制执行 |
exec.command | string | policy 可执行文件的绝对路径(不通过 shell 启动) |
exec.args | string[] | 传给可执行文件的静态参数列表 |
exec.timeoutMs | number | 单次决策的 wall-clock 超时(毫秒) |
exec.noOutputTimeoutMs | number | 无任何 stdout/stderr 输出的超时(毫秒),防止 policy 进程僵死 |
Policy 可执行文件的协议
OpenClaw 通过 stdin 向 policy 可执行文件发送 JSON 格式的结构化请求:
{
"operation": "install",
"target_type": "plugin",
"target": {
"name": "community-mcp-server",
"version": "2.1.0",
"source": "npm",
"source_detail": "community-mcp-server@2.1.0",
"clawhub_metadata": {
"verified": true,
"publisher": "verified-publisher-org",
"downloads": 15420,
"last_updated": "2026-06-01"
}
},
"request_id": "req_a1b2c3d4",
"timestamp": "2026-06-04T01:00:00Z"
}
Policy 可执行文件通过 stdout 返回决策:
{
"decision": "allow",
"reason": "Verified ClawHub publisher, manual review completed",
"request_id": "req_a1b2c3d4"
}
或拒绝:
{
"decision": "deny",
"reason": "Plugin from untrusted source, requires security review",
"request_id": "req_a1b2c3d4"
}
决策字段:只有 allow 和 deny 两个值。没有 defer——你的 policy 必须给出明确判断。
配置实战:从零搭建安全安装策略
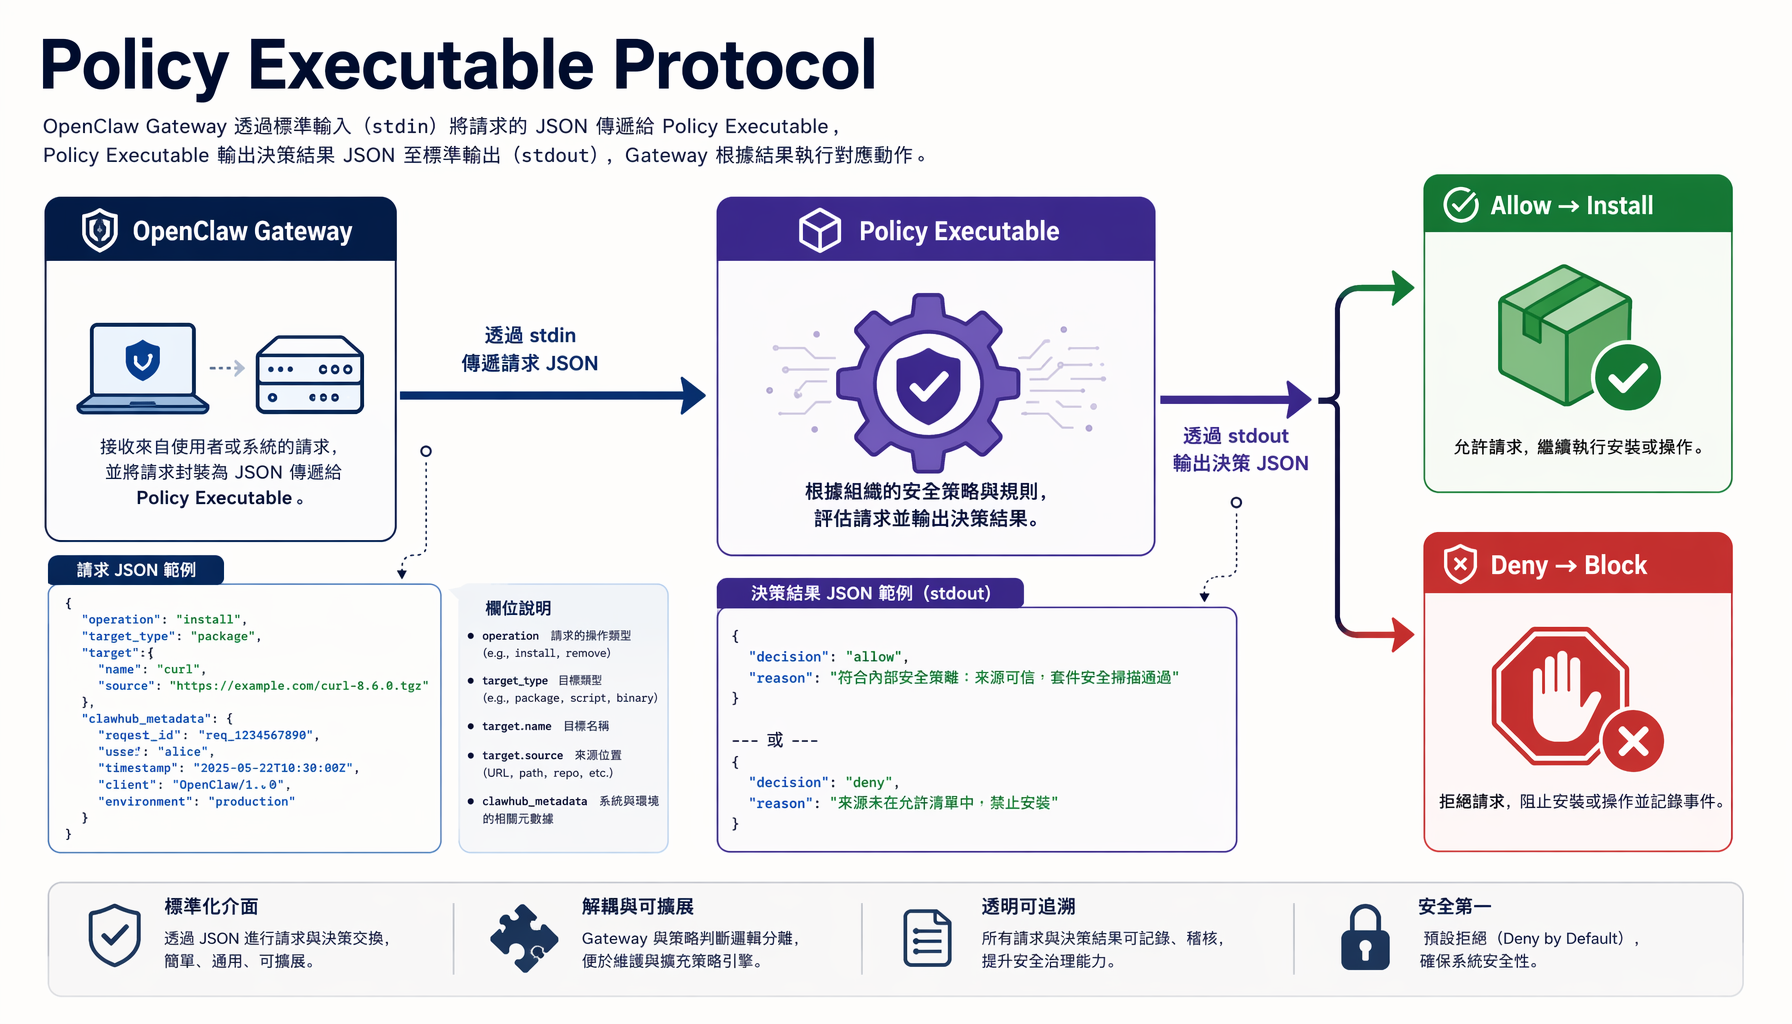
▲ 图2:Policy Executable Protocol详解 — OpenClaw Gateway通过stdin/stdout与自定义策略脚本的JSON通信协议
第一步:编写 Policy 可执行文件
以下是一个生产可用的 Python policy 脚本模板:
#!/usr/bin/env python3
"""
OpenClaw Install Policy — 生产环境安全策略脚本
安装路径:/usr/local/bin/openclaw-install-policy
权限要求:chmod 755,owner root
"""
import json
import sys
import os
from datetime import datetime
# ========== 配置区(按你的环境修改) ==========
TRUSTED_PUBLISHERS = {
"verified-publisher-org",
"openclaw-official",
"anthropic-official",
}
ALLOWED_SOURCES = {"npm", "clawhub", "local"}
REQUIRE_REVIEW_FOR = {"archive", "git", "upload"}
# 高风险关键词(插件名或描述中包含则拒绝)
BLOCKED_KEYWORDS = {"crypto-miner", "exfiltration", "reverse-shell"}
AUDIT_LOG = "/var/log/openclaw/install-policy.log"
# ==============================================
def log_decision(request_id, decision, reason, target_name):
"""记录所有决策到审计日志"""
os.makedirs(os.path.dirname(AUDIT_LOG), exist_ok=True)
with open(AUDIT_LOG, "a") as f:
f.write(
f"{datetime.utcnow().isoformat()} | "
f"req={request_id} | "
f"decision={decision} | "
f"target={target_name} | "
f"reason={reason}\n"
)
def evaluate(request: dict) -> dict:
"""核心决策逻辑"""
target = request.get("target", {})
target_name = target.get("name", "unknown")
source = target.get("source", "unknown")
metadata = target.get("clawhub_metadata", {})
request_id = request.get("request_id", "unknown")
# 规则1:检查来源是否允许
if source not in ALLOWED_SOURCES:
return {
"decision": "deny",
"reason": f"Source '{source}' is not in allowed sources: {ALLOWED_SOURCES}",
"request_id": request_id,
}
# 规则2:需要人工审核的来源
if source in REQUIRE_REVIEW_FOR:
return {
"decision": "deny",
"reason": f"Source '{source}' requires manual security review before installation",
"request_id": request_id,
}
# 规则3:高风险关键词检测
target_str = json.dumps(target).lower()
for keyword in BLOCKED_KEYWORDS:
if keyword.lower() in target_str:
return {
"decision": "deny",
"reason": f"Blocked keyword '{keyword}' detected in plugin metadata",
"request_id": request_id,
}
# 规则4:ClawHub 认证检查(配合本地信任名单)
publisher = metadata.get("publisher", "")
is_verified = metadata.get("verified", False)
if is_verified and publisher in TRUSTED_PUBLISHERS:
return {
"decision": "allow",
"reason": f"Verified ClawHub publisher '{publisher}', auto-approved",
"request_id": request_id,
}
# 规则5:未知发布者 — 检查白名单
if publisher in TRUSTED_PUBLISHERS:
return {
"decision": "allow",
"reason": f"Publisher '{publisher}' in local trust list",
"request_id": request_id,
}
# 规则6:默认拒绝(fail-closed)
return {
"decision": "deny",
"reason": f"Publisher '{publisher}' not in trust list, requires manual review",
"request_id": request_id,
}
def main():
try:
raw = sys.stdin.read()
if not raw.strip():
print(json.dumps({
"decision": "deny",
"reason": "Empty stdin, policy requires structured request",
"request_id": "unknown",
}))
sys.exit(0)
request = json.loads(raw)
result = evaluate(request)
# 写入审计日志
log_decision(
result["request_id"],
result["decision"],
result["reason"],
request.get("target", {}).get("name", "unknown"),
)
# 输出决策
print(json.dumps(result))
sys.exit(0)
except json.JSONDecodeError as e:
print(json.dumps({
"decision": "deny",
"reason": f"Invalid JSON input: {str(e)}",
"request_id": "unknown",
}))
sys.exit(0)
except Exception as e:
# 任何未处理异常→拒绝(fail-closed)
print(json.dumps({
"decision": "deny",
"reason": f"Policy evaluation error: {str(e)}",
"request_id": request.get("request_id", "unknown"),
}))
sys.exit(0)
if __name__ == "__main__":
main()
第二步:部署 Policy 脚本
# 1. 安装脚本
sudo cp openclaw-install-policy.py /usr/local/bin/openclaw-install-policy
sudo chmod 755 /usr/local/bin/openclaw-install-policy
sudo chown root:root /usr/local/bin/openclaw-install-policy
# 2. 测试 policy 是否正常工作
echo '{"operation":"install","target_type":"plugin","target":{"name":"test-plugin","version":"1.0.0","source":"npm","clawhub_metadata":{"verified":true,"publisher":"verified-publisher-org"}},"request_id":"test-001","timestamp":"2026-06-04T01:00:00Z"}' | /usr/local/bin/openclaw-install-policy
# 期望输出:{"decision": "allow", "reason": "Verified Clawhub publisher 'verified-publisher-org', auto-approved", "request_id": "test-001"}
# 3. 测试拒绝场景(未认证来源)
echo '{"operation":"install","target_type":"plugin","target":{"name":"random-plugin","version":"0.1.0","source":"git","clawhub_metadata":{}},"request_id":"test-002","timestamp":"2026-06-04T01:00:00Z"}' | /usr/local/bin/openclaw-install-policy
# 期望输出:{"decision": "deny", ...}
第三步:配置 OpenClaw
# openclaw.yaml
security:
installPolicy:
enabled: true
exec:
command: /usr/local/bin/openclaw-install-policy
timeoutMs: 15000
noOutputTimeoutMs: 5000
重启 OpenClaw Gateway 后生效。
第四步:验证 Policy 生效
# 查看 OpenClaw 日志确认 policy 已加载
openclaw doctor | grep -A 5 "install policy"
# 尝试安装一个插件(会触发 policy 检查)
openclaw plugins install community-mcp-server
# 检查审计日志
cat /var/log/openclaw/install-policy.log
从旧方案迁移:checklist
如果你之前在使用内置扫描器,以下是你需要知道的:
| 旧行为 | 新行为 | 迁移操作 |
|---|
scan: false 关闭扫描 | 已移除,不再生效 | 删除配置中的 scan 字段,配置 security.installPolicy |
--dangerously-force-unsafe-install | 保留但 no-op,输出废弃警告 | 不再使用此参数,改用 policy 的白名单逻辑 |
| 内置扫描器自动拦截 | 不再存在 | 将所有安全规则迁移到 policy 脚本中 |
| 插件依赖黑名单 | 保留,继续生效 | 无需操作,这是独立防线 |
before_install 钩子 | 保留,继续生效 | 无需操作 |
迁移步骤:
- 列出当前所有已安装插件:
openclaw plugins list - 确认哪些插件是业务必需的(加入白名单)
- 编写 policy 脚本(参考上文模板)
- 先在测试环境验证 policy 逻辑是否正确
- 生产环境部署并监控审计日志 24 小时
- 确认无误后删除旧配置中的
scan 相关字段
关键提醒:迁移期间不要直接在生产环境开启 enabled: true——先在 openclaw doctor 的 dry-run 模式下验证所有现有插件的安装路径都不会被误拦。
踩坑与排障
坑1:Policy 超时导致所有安装失败
症状:openclaw plugins install xxx 报错 install policy timed out,但 policy 脚本手动测试正常。
原因:timeoutMs 设置太短(如 1000ms),policy 脚本中如果有网络请求(如查内部 API),容易超时。
修复:timeoutMs 建议不低于 10000ms,如果有网络调用则设为 30000ms。
坑2:Python 脚本 shebang 路径问题
症状:policy 报错 exec format error 或找不到解释器。
原因:exec.command 必须指向可直接执行的文件。如果 shebang 是 #!/usr/bin/env python3 但容器/环境中 python3 不在 PATH,会失败。
修复:
# 方案A:用绝对路径 shebang
# 脚本第一行改为:#!/usr/bin/python3
# 方案B:用包装脚本
exec:
command: /usr/bin/python3
args:
- "/usr/local/bin/openclaw-install-policy.py"
坑3:`noOutputTimeoutMs` 设太短
症状:policy 在某些情况下被误判为超时,实际只是启动较慢。
原因:Python 解释器冷启动可能在 2-3 秒,如果 noOutputTimeoutMs 设 1000ms,还没执行到 print() 就被杀了。
修复:noOutputTimeoutMs 至少 3000ms,推荐 5000ms。
坑4:ClawHub 元数据为空的处理
症状:本地安装的 .tgz 包或 file:// 路径的插件,clawhub_metadata 为空对象 {},policy 中的 publisher 检查返回空字符串,导致误拒。
修复:在 policy 逻辑中区分 source 类型处理:
# 本地来源放宽限制
if source in ("local", "upload"):
# 本地安装默认信任(因为运维者已经手动获取了文件)
return {"decision": "allow", "reason": f"Local source '{source}' trusted by default"}
最佳实践:一人公司的安全配置
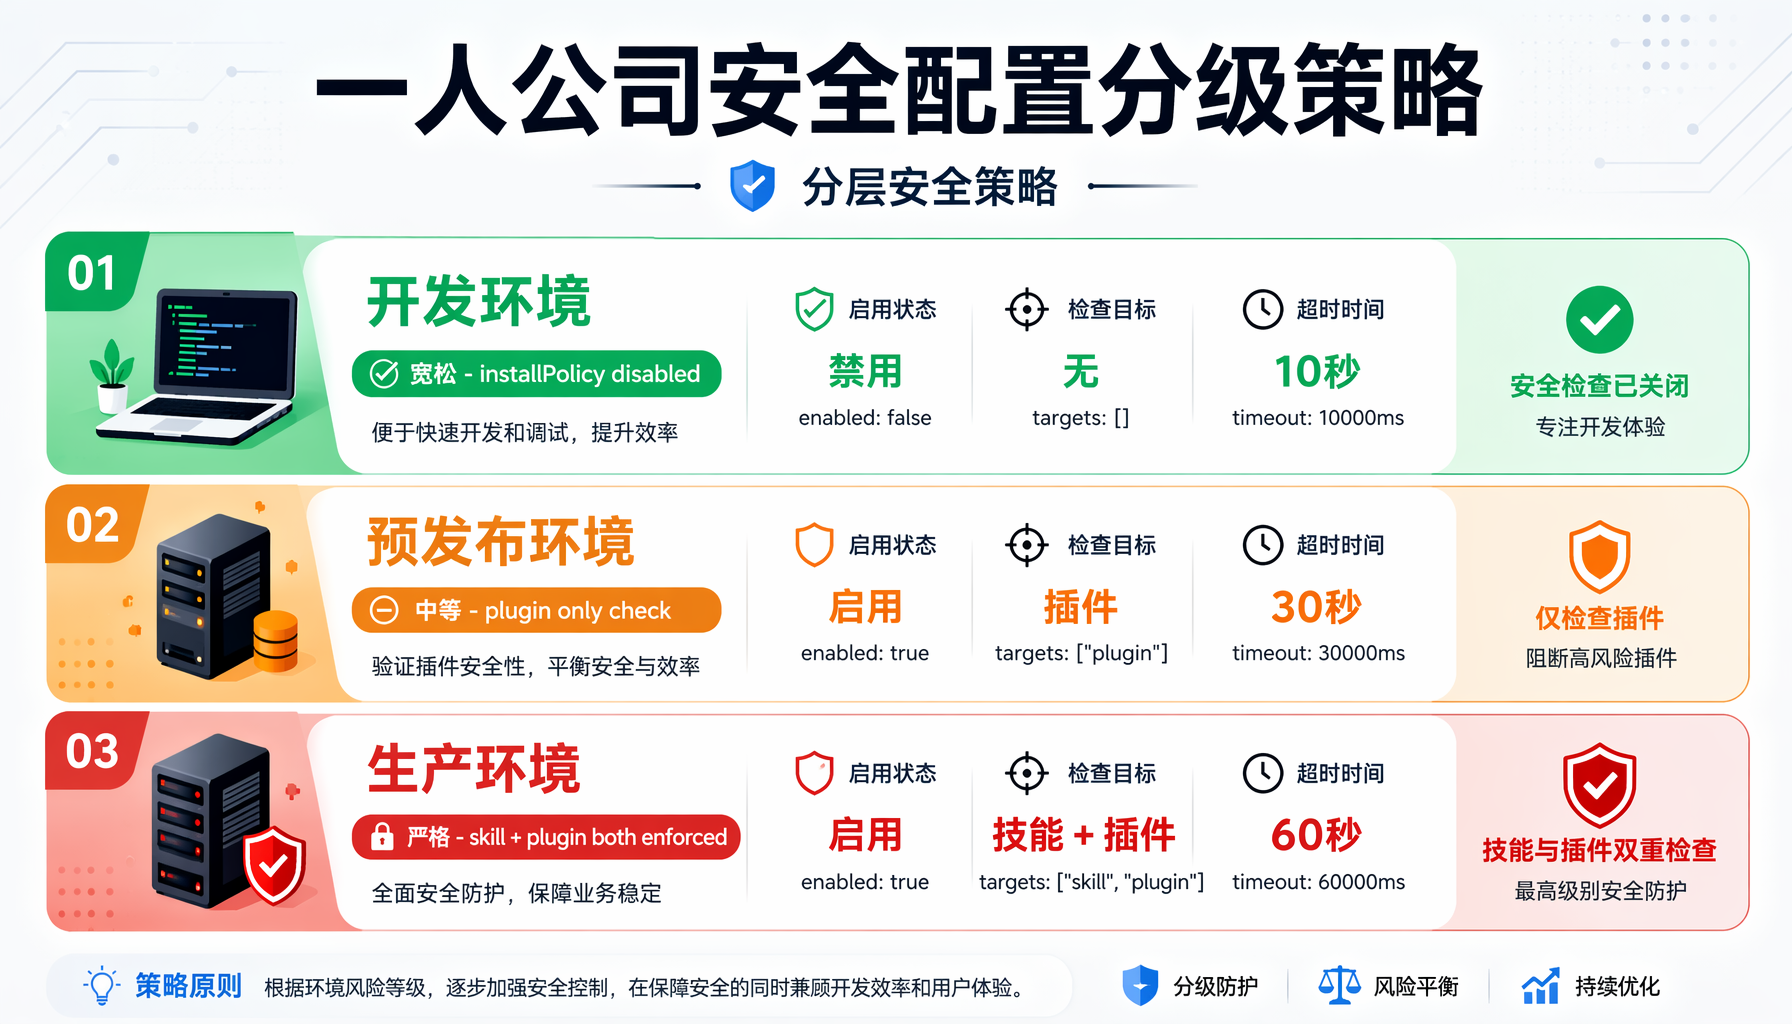
▲ 图3:一人公司安全配置分级策略 — 开发/预发布/生产三环境的分层安全管控方案
对于 AI 创业内参的典型读者——一人公司或小团队,推荐以下分级策略:
开发环境(宽松)
security:
installPolicy:
enabled: false # 开发环境关闭,快速迭代
预发布环境(中等)
security:
installPolicy:
enabled: true
targets: [plugin] # 只检查插件,skill 放行
exec:
command: /usr/local/bin/openclaw-install-policy
args: ["--mode=staging"] # staging 模式更宽松
timeoutMs: 15000
生产环境(严格)
security:
installPolicy:
enabled: true
targets: [skill, plugin] # skill 和 plugin 都检查
exec:
command: /usr/local/bin/openclaw-install-policy
args: ["--mode=production"]
timeoutMs: 30000
noOutputTimeoutMs: 5000
Policy 脚本的渐进式策略
建议按以下优先级排序你的 policy 规则:
- 黑名单优先:已知恶意关键词、域名、发布者 → 直接拒绝
- 白名单快速通道:已验证的 ClawHub 发布者 → 自动批准
- 来源分级:npm/clawhub 自动批准,git/archive 要求人工审核
- 默认拒绝:不匹配任何白名单的 → 拒绝,留待安全评审
总结
OpenClaw v2026.6.2 的 operator install policy 不是简单的功能替换,而是 AI Agent 安全治理的范式升级:
- 从「厂商替你判断」到「运维者掌控一切」:安全策略变成你的自定义代码,而非厂商的黑盒规则
- 从「静态规则」到「动态决策」:policy 脚本可以查数据库、调 API、接入审批流——安全判断不再受限于预定义规则
- 从「要么全开要么全关」到「精细化分级」:开发/预发布/生产环境各自独立配置
对于 AI 创业者和一人公司而言,这意味着你可以在享受社区插件生态便利的同时,保持对生产环境安全的完全控制。花一小时写好你的 policy 脚本,未来每一次插件安装都在你的掌控之中。
行动建议:
- 今天:更新 OpenClaw 到 v2026.6.2-beta.1
- 明天:编写你的第一个 policy 脚本(复制上文模板即可起步)
- 本周:在测试环境验证,制定你的信任名单
- 下周:生产环境上线,监控审计日志
本文由AI辅助创作,经人工审核编辑发布