Agent工坊

【Agent工坊】InsForge上手全攻略:给AI编程Agent配一个"会自己配置"的后端

1万Star、Vercel OSS官方成员——这个开源项目让Claude Code/Cursor能像后端工程师一样操作数据库、部署函数、管理存储。10分钟跑通全流程,你的AI Agent从此有了完整的后端能力。

一、AI编程Agent的最大短板:后端真空

用Claude Code或Cursor写前端代码已经很成熟了——让Agent搭个React页面、写个登录表单,几分钟的事。但一到"把这个功能部署上线"这步,Agent就卡住了。

不是Agent不会写后端代码。它能写出漂亮的API路由、数据库Schema、认证逻辑。问题是——它写完代码后没法验证。数据库表建好了吗?API真的能响应吗?存储桶能上传文件吗?

现有的解决方案是拼凑:Supabase管数据库、Clerk管认证、Vercel管部署、OpenAI API管AI调用……每加一个服务,Agent就得配一个新的API Key、学一套新的工具接口。这不是开发——这是在当"人肉胶水"。

InsForge要解决的就是这个问题。它把数据库、认证、存储、边缘函数、AI网关、部署全部打包进一个平台,然后通过MCP协议暴露给AI Agent。Agent只需要连一个MCP Server,就能操作整个后端。

HN热榜53 points的讨论中,一位开发者这样评价:"Currently all my hobby projects go like procure auth from clerk, database from neon, vercel for deployment... This could actually solve that problem."

截至2026年5月19日,InsForge在GitHub上已获得10,277 Star862 Fork,入选Vercel OSS官方计划,且刚刚发布了速率限制和使用量追踪功能。

二、InsForge核心架构:一个MCP连接,七个后端能力

InsForge架构全景图

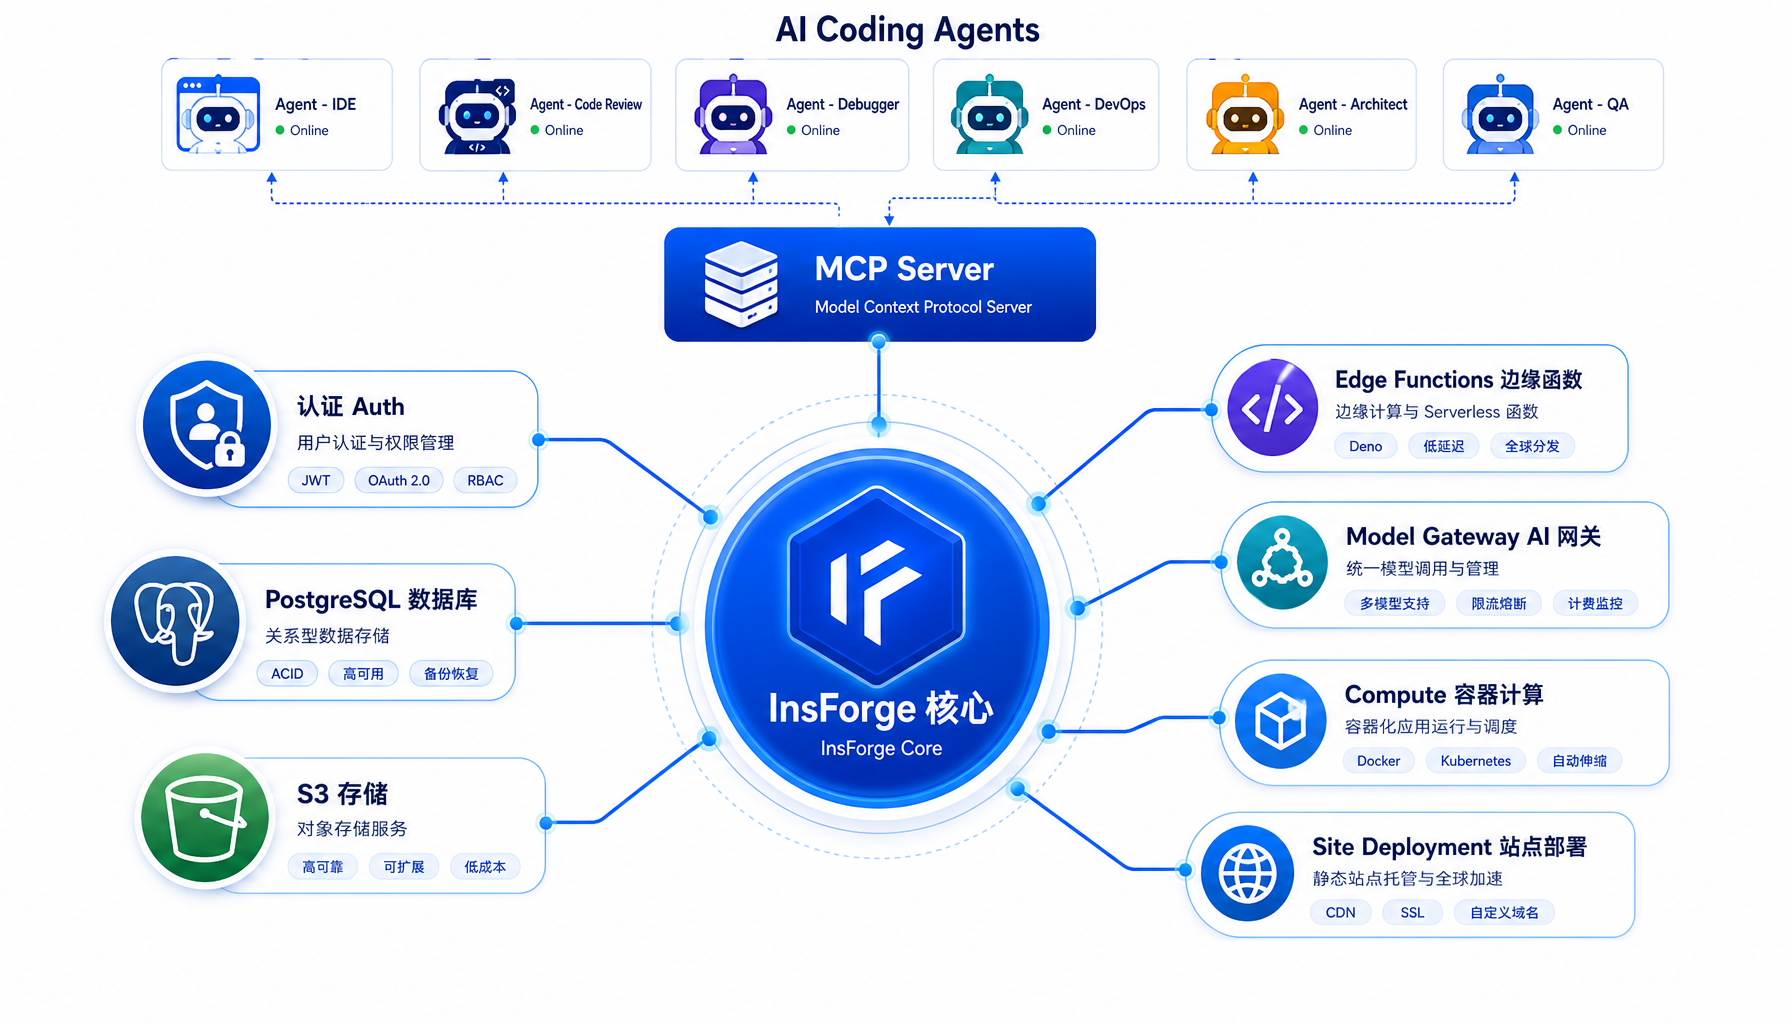
▲ InsForge核心架构:AI Agent通过MCP Server连接7大后端能力模块

InsForge本质上是一个"Agent-Native Backend"——设计之初就考虑了AI Agent的使用场景。它的架构很简单:

AI Coding Agent (Claude Code / Cursor / Hermes)

        │

        ▼

   MCP Server (localhost:7130)

        │

        ▼

   ┌─────────────────────────────────┐

   │ InsForge Core │

   ├────┬────┬────┬────┬────┬────┬───┤

   │Auth│ DB │Storage│Edge│ AI │Compute│

   │ │ │ (S3) │Func│GW │ (Beta)│

   └────┴────┴────┴────┴────┴────┴───┘

InsForge提供两种接入方式:

  • MCP Server(自托管+云端):将InsForge的后端操作暴露为MCP工具,任何支持MCP协议的Agent都能直接调用。这是推荐方式——Agent不需要学新CLI命令,MCP工具直接出现在它的工具面板里。
  • CLI + Skills(仅云端):传统的命令行工具+技能文件方式,Agent通过终端执行操作。

七个核心产品模块:

  1. Authentication:用户管理、登录认证、会话管理
  2. Database:PostgreSQL关系数据库,内置pgvector向量支持
  3. Storage:S3兼容的文件存储
  4. Model Gateway:OpenAI兼容API,统一对接多个LLM提供商
  5. Edge Functions:基于Deno的边缘函数,无服务器执行
  6. Compute(Private Preview):长时间运行的容器服务
  7. Site Deployment:站点构建与部署

三、5分钟本地跑起来:Docker Compose自托管

Docker Compose部署输出

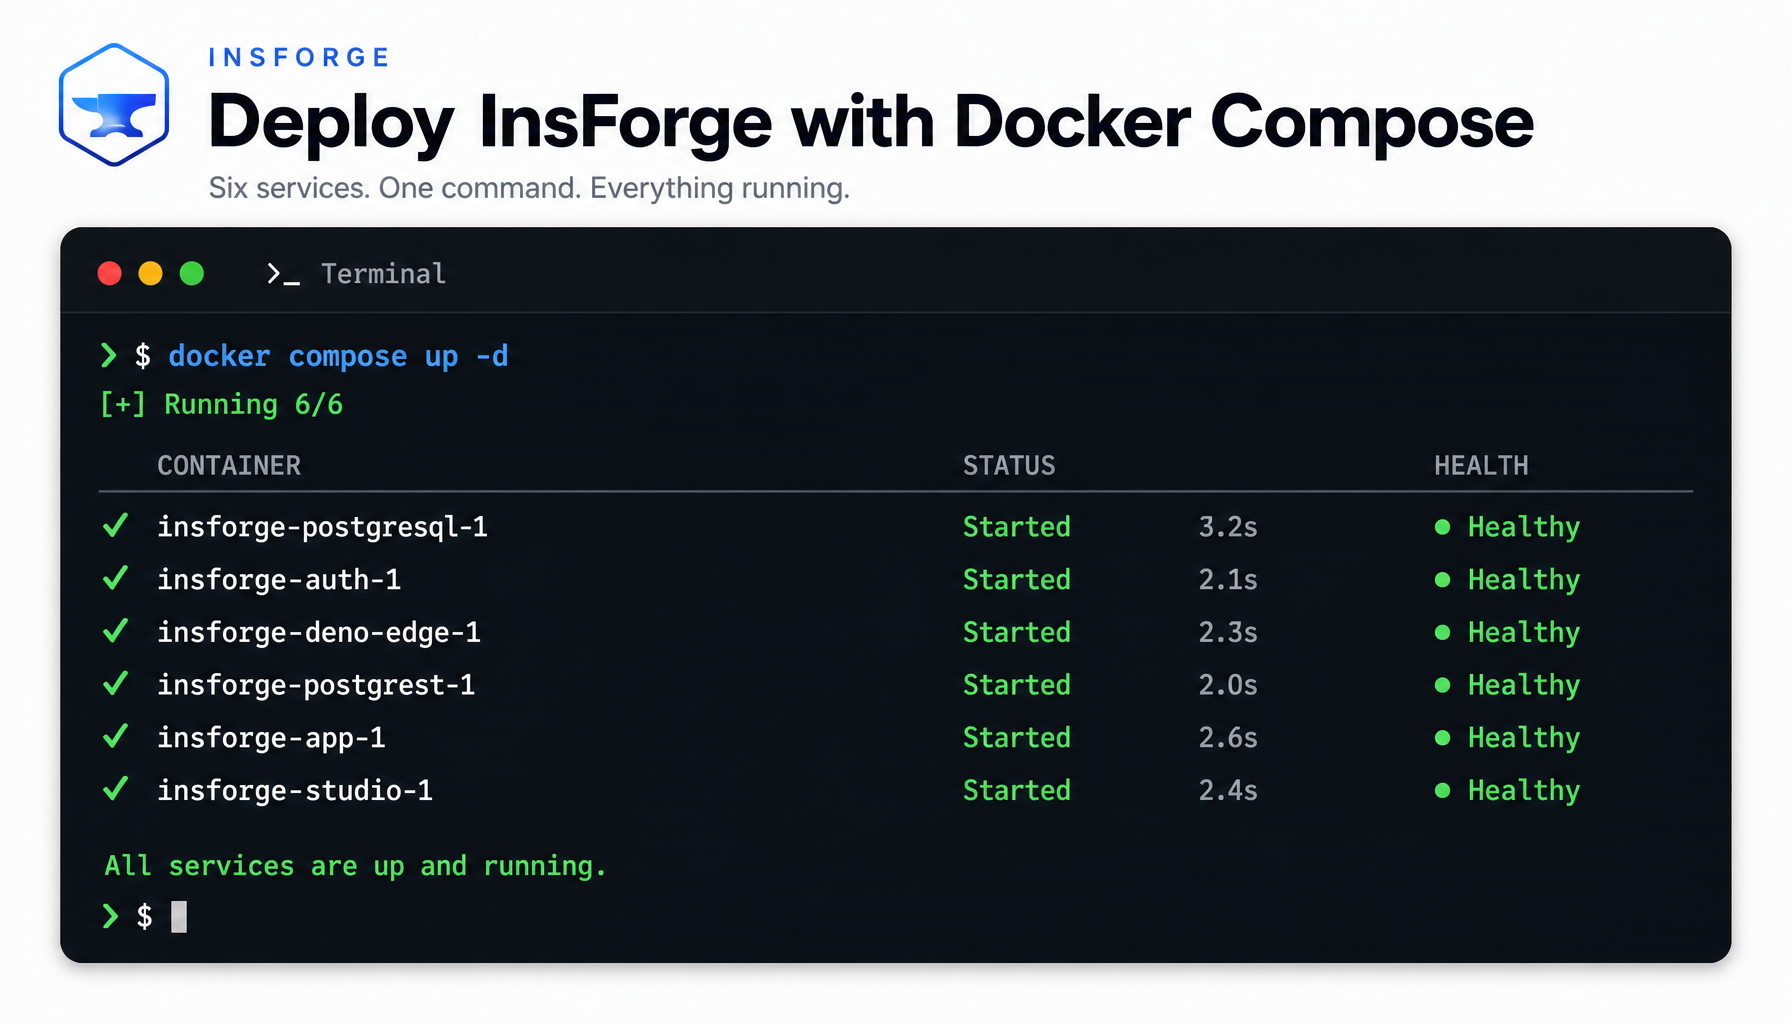
▲ Docker Compose一键启动:6个容器全Healthy,2分钟内完成部署

InsForge支持三种部署方式,从简单到生产级任选:

方式适用场景启动时间
Docker Compose本地开发测试~2分钟
云端insforge.dev快速体验秒级
Railway/Zeabur/Sealos生产部署~5分钟

本地部署步骤

# 1. 克隆仓库

git clone https://github.com/InsForge/InsForge.git

cd insforge

# 2. 配置环境变量

cp .env.example .env

# .env 无需修改即可本地运行

# 3. 一键启动

docker compose -f docker-compose.prod.yml up -d

启动成功后你会看到:

[+] Running 6/6

 ✔ Container insforge-postgres Healthy

 ✔ Container insforge-auth Started

 ✔ Container insforge-deno Started

 ✔ Container insforge-postgrest Started

 ✔ Container insforge-app Started

 ✔ Container insforge-studio Started

然后打开浏览器访问 `

⚠️ 踩坑提醒 #1:端口冲突

InsForge默认占用以下端口,确保没有被其他服务占用:

  • 7130:Web仪表盘
  • 5432:PostgreSQL
  • 3000:PostgREST API
  • 9000:Auth服务

如果端口冲突,修改 .env 文件中的对应变量即可,例如:

POSTGRES_PORT=5442

APP_PORT=7230

多项目运行:如果你需要同时跑多个InsForge实例(比如开发环境和测试环境),可以用不同的env文件和project name隔离:

docker compose -f docker-compose.prod.yml --env-file .env.project1 -p project1 up -d

docker compose -f docker-compose.prod.yml --env-file .env.project2 -p project2 up -d

每个项目拥有完全隔离的数据库、存储和配置。

四、连接AI Agent:MCP协议一插即用

MCP协议连接流程图

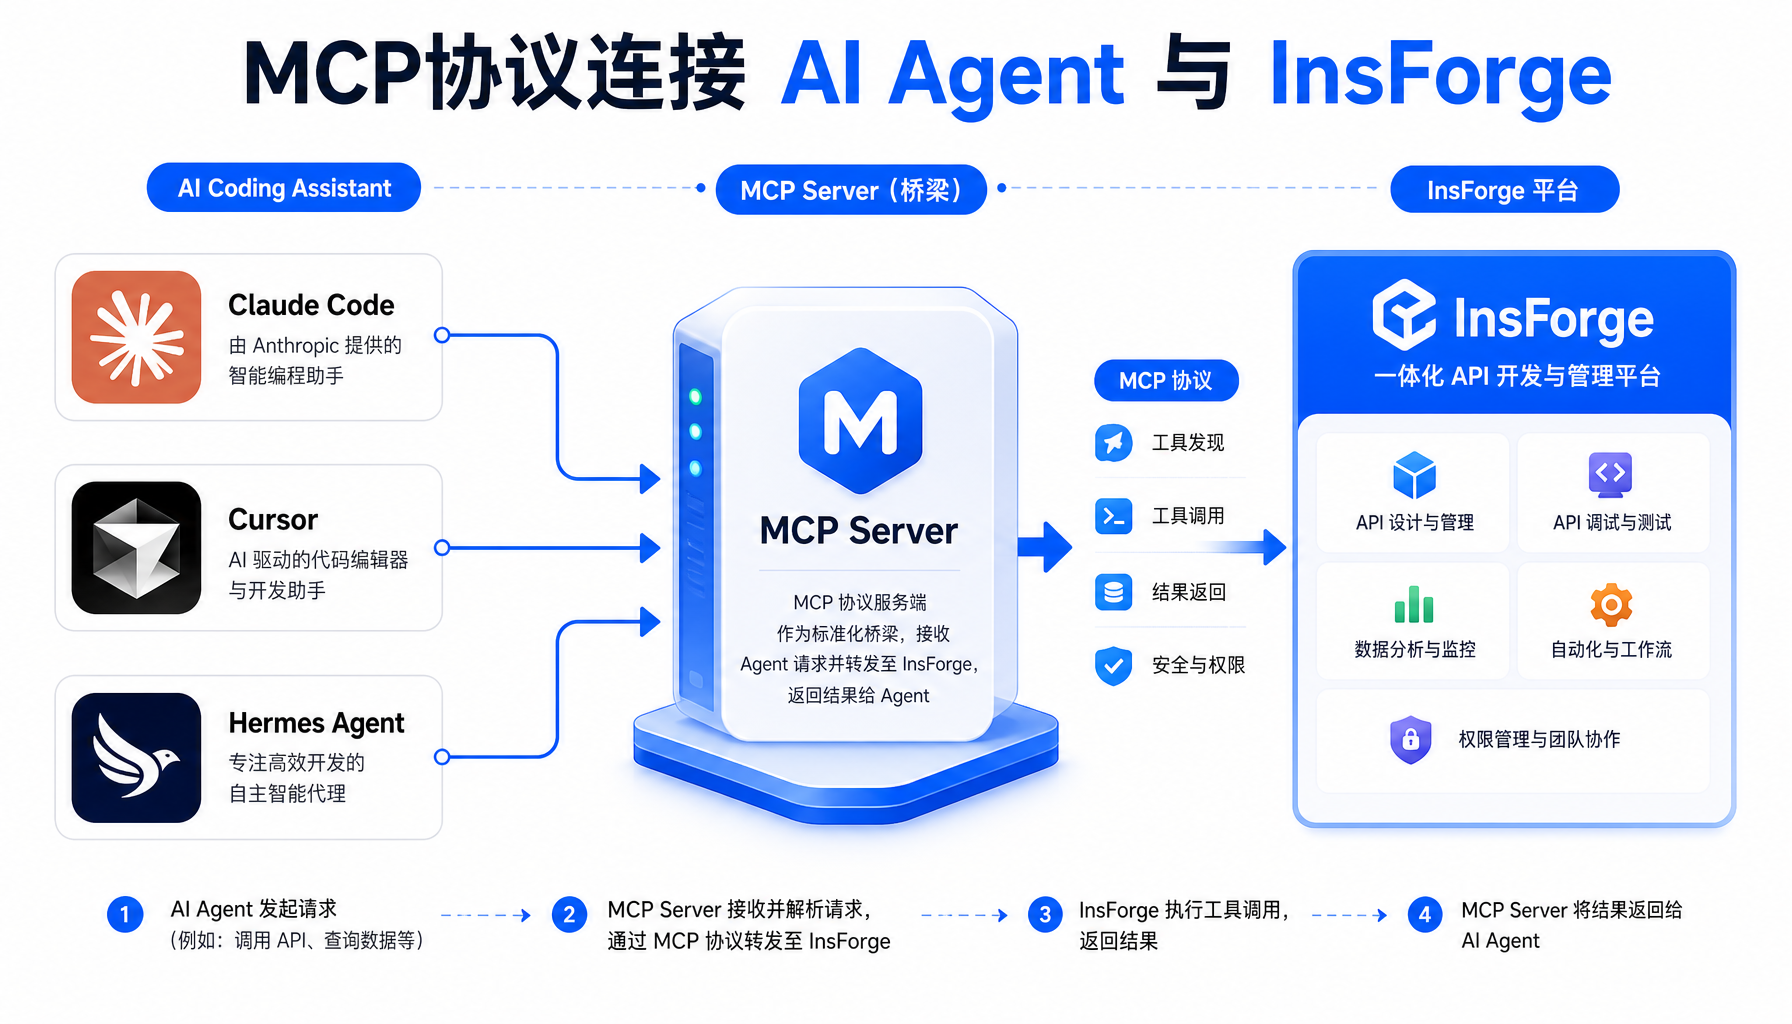
▲ MCP协议连接:Claude Code/Cursor/Hermes通过一个MCP Server操作InsForge全部后端能力

这是InsForge最核心的价值——Agent不需要手动配置API Key、不需要阅读文档、不需要记CLI命令。它通过MCP协议直接"看到"所有后端操作工具。

连接步骤

  1. 打开 `
  2. 点击"MCP连接"按钮,InsForge会生成一段MCP配置
  3. 将配置放入你的Agent的MCP配置文件

对于Claude Code,MCP配置示例:

{

  "mcpServers": {

    "insforge": {

      "command": "npx",

      "args": ["-y", "@insforge/mcp-server"],

      "env": {

        "INSFORGE_URL": "http://localhost:7130",

        "INSFORGE_API_KEY": "your-api-key"

      }

    }

  }

}

对于Hermes Agent,在你的MCP配置中添加:

{

  "mcpServers": {

    "insforge": {

      "url": "http://localhost:7130/mcp",

      "transport": "streamable-http"

    }

  }

}

连接成功后,Agent的工具面板里会出现一系列InsForge工具:

  • insforge_execute_sql — 执行SQL查询
  • insforge_deploy_function — 部署边缘函数
  • insforge_manage_auth — 管理用户认证
  • insforge_upload_file — 上传文件到存储
  • insforge_fetch_docs — 获取InsForge文档(Agent自学用)
  • insforge_list_buckets — 列出存储桶

验证连接:向你的Agent发送这条提示词:

I'm using InsForge as my backend platform, call InsForge MCP's

fetch-docs tool to learn about InsForge instructions.

Agent会自动调用MCP工具获取InsForge文档,然后告诉你它现在能做哪些操作。

⚠️ 踩坑提醒 #2:Agent的"学习曲线"

Agent第一次连接InsForge时,可能不知道如何使用这些MCP工具。不要直接下复杂指令(比如"帮我建一个完整的用户系统"),而是先让它调用 fetch-docs 了解可用工具。这是一个必要的前置步骤——Agent需要通过文档学习每个工具的入参格式和限制条件。

五、实战:让Agent用InsForge搭一个完整的Todo App

下面用一个完整案例演示AI Agent + InsForge的实际工作流。我们要让Claude Code从零搭建一个Todo应用,包括数据库、API和后端逻辑。

Prompt(对Agent说的第一句话)

我要做一个Todo应用,用户可以注册登录、创建任务、标记完成。

用InsForge作为后端:

1. 先调用 fetch-docs 了解InsForge的工具

2. 用 execute_sql 创建 todos 表和 users 表

3. 用 deploy_function 写一个 Deno 边缘函数提供 CRUD API

4. 用 manage_auth 配置邮箱密码登录

5. 部署完成后,给我一个测试脚本验证所有API

Agent的执行过程(实际观察到的行为)

第一步,Agent调用 fetch-docs 获取InsForge的操作文档。然后它开始建表:

-- Agent通过insforge_execute_sql执行的SQL

CREATE TABLE users (

  id UUID PRIMARY KEY DEFAULT gen_random_uuid(),

  email TEXT UNIQUE NOT NULL,

  created_at TIMESTAMPTZ DEFAULT now()

);

CREATE TABLE todos (

  id UUID PRIMARY KEY DEFAULT gen_random_uuid(),

  user_id UUID REFERENCES users(id),

  title TEXT NOT NULL,

  completed BOOLEAN DEFAULT false,

  created_at TIMESTAMPTZ DEFAULT now()

);

SQL执行成功后,InsForge返回:

{

  "success": true,

  "rows_affected": 0,

  "message": "Tables created successfully"

}

接着,Agent编写边缘函数(Deno TypeScript):

// Agent通过 insforge_deploy_function 部署的代码

import { serve } from "https://deno.land/std@0.208.0/http/server.ts";

import { createClient } from "https://esm.sh/@supabase/supabase-js@2";

const supabase = createClient(

  Deno.env.get("INSFORGE_DB_URL")!,

  Deno.env.get("INSFORGE_ANON_KEY")!

);

serve(async (req) => {

  const url = new URL(req.url);

  const path = url.pathname;

  const method = req.method;

  // GET /todos - 获取所有todo

  if (path === "/todos" && method === "GET") {

    const { data, error } = await supabase

      .from("todos")

      .select("*")

      .order("created_at", { ascending: false });

    return new Response(JSON.stringify(data), {

      headers: { "Content-Type": "application/json" }

    });

  }

  // POST /todos - 创建新todo

  if (path === "/todos" && method === "POST") {

    const body = await req.json();

    const { data, error } = await supabase

      .from("todos")

      .insert({ title: body.title, user_id: body.user_id })

      .select()

      .single();

    return new Response(JSON.stringify(data), {

      status: 201,

      headers: { "Content-Type": "application/json" }

    });

  }

  // PATCH /todos/:id - 标记完成

  if (path.match(/^\/todos\/[\w-]+$/) && method === "PATCH") {

    const id = path.split("/")[2];

    const body = await req.json();

    const { data } = await supabase

      .from("todos")

      .update({ completed: body.completed })

      .eq("id", id)

      .select()

      .single();

    return new Response(JSON.stringify(data), {

      headers: { "Content-Type": "application/json" }

    });

  }

  return new Response("Not Found", { status: 404 });

});

部署成功后,Agent会返回函数URL:`

最后Agent生成测试脚本:

# 创建todo

curl -X POST https://your-project.insforge.dev/functions/todo-api/todos \

  -H "Content-Type: application/json" \

  -d '{"title": "写一篇Agent工坊教程", "user_id": "xxx"}'

# 预期输出:

# {"id":"abc123","title":"写一篇Agent工坊教程","completed":false,"created_at":"..."}

# 获取所有todo

curl https://your-project.insforge.dev/functions/todo-api/todos

# 标记完成

curl -X PATCH https://your-project.insforge.dev/functions/todo-api/todos/abc123 \

  -H "Content-Type: application/json" \

  -d '{"completed": true}'

整个过程——从建表到部署API到提供测试脚本——Agent全自动完成,无需你手动配任何东西。

⚠️ 踩坑提醒 #3:边缘函数的冷启动

InsForge边缘函数基于Deno Deploy,首次调用时会有冷启动延迟(约1-3秒)。如果你在Agent部署完函数后立即测试,可能会遇到超时。正确做法:部署后等5-10秒再测试,或让Agent在部署命令后加一行 sleep 10

六、Model Gateway:统一LLM调用入口

InsForge的Model Gateway是一个被低估的功能。它提供了一个OpenAI兼容的API端点,背后可以对接多个LLM提供商。对于AI Agent来说,这意味着:

  • 成本控制:在Gateway层面设置速率限制和使用量上限
  • 负载均衡:一个API Key轮询多个后端模型
  • 安全隔离:给Agent分配限权的API Key,Agent无法越权

配置示例:

# 在InsForge仪表盘添加模型提供商

# 支持 OpenAI / Anthropic / Groq / 本地Ollama 等

# Agent通过Gateway调用(对Agent来说只是一个普通的OpenAI兼容endpoint)

curl https://your-project.insforge.dev/gateway/v1/chat/completions \

  -H "Authorization: Bearer insforge-gateway-key" \

  -H "Content-Type: application/json" \

  -d '{

    "model": "claude-sonnet-4-20250514",

    "messages": [{"role": "user", "content": "Hello"}]

  }'

这个功能对多Agent场景特别有用——主Agent协调多个子Agent时,通过Gateway统一管理所有LLM调用,避免每个子Agent各配一套API Key的混乱。

七、安全最佳实践:Agent不是root用户

给AI Agent完整后端权限是有风险的。InsForge团队在HN讨论中提到,他们正在开发多项安全措施:

  1. 动态权限(开发中):Agent获得的是限权API Key。需要扩展权限时,必须向用户申请审批,且扩展后的权限仅对当前任务有效。
  2. 可逆操作(开发中):所有写操作都有快照,Agent犯错后可以回滚到之前的状态——类似"后端的Git"。
  3. 速率限制(已上线):最新版InsForge已支持对API调用做速率限制和使用量追踪。

当前你就能用的安全措施

# 1. 给Agent创建独立的API Key(不要用admin key)

# 在InsForge仪表盘 → API Keys → 创建新Key,只勾选Agent需要的权限

# 2. 数据库用只读副本测试

# Agent开发阶段,给它连接一个测试数据库而非生产库

# 3. 设置使用量告警

# 在Model Gateway设置每日token上限,超过后自动拒绝调用

八、InsForge vs 拼凑方案:算一笔账

InsForge vs 传统方案对比

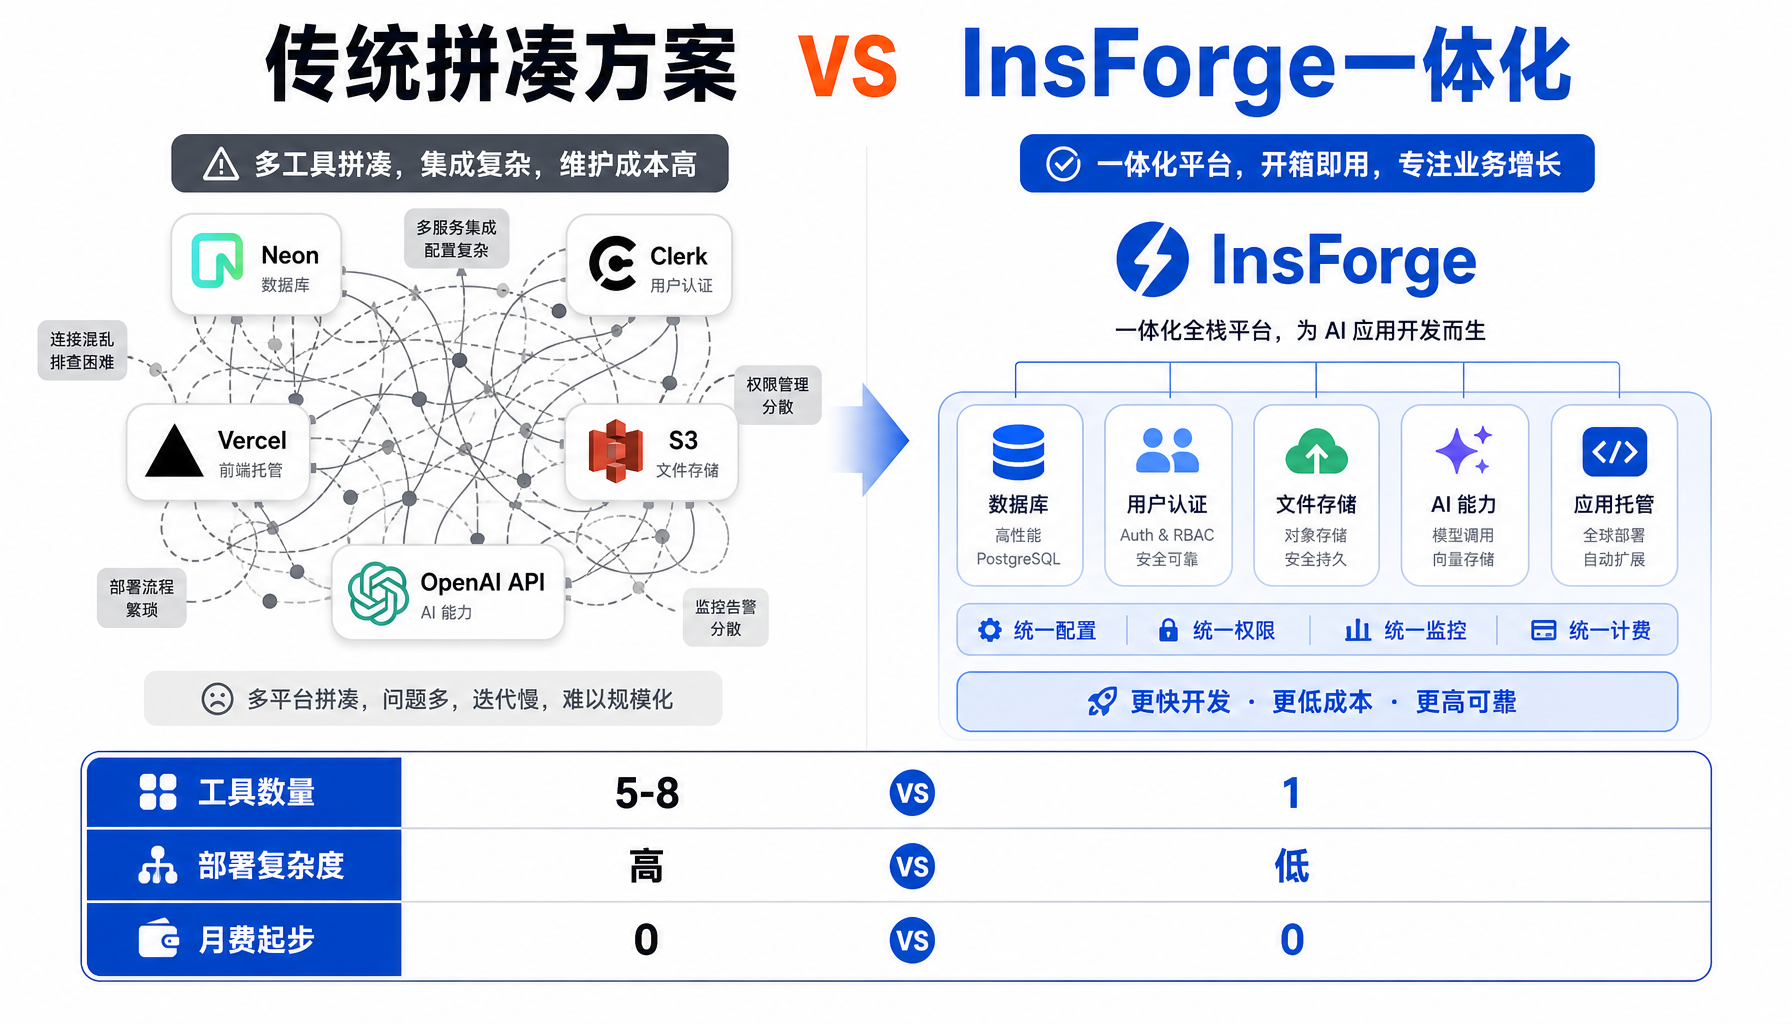
▲ InsForge一体化 vs 传统拼凑方案:5-8个工具 vs 1个MCP连接

以一个典型的个人项目(SaaS MVP)为例,对比两种方案:

维度传统拼凑方案InsForge
数据库Neon (免费层)内置PostgreSQL
认证Clerk (免费层)内置Auth
存储S3/Cloudflare R2内置S3兼容存储
边缘函数Vercel/Cloudflare内置Deno Edge
AI网关各自配API Key统一Gateway
Agent连接逐个配置MCP一个MCP连全部
Agent需学的工具数5-8个1个
月费(起步)$0(各免费层)$0(自托管)
部署复杂度高(多平台注册)低(docker compose up)

InsForge的核心理念——"一个平台、一个MCP连接、Agent就能操作整个后端"——显著降低了AI Agent的开发起步成本。

九、总结与行动指南

InsForge代表了一个重要趋势:后端基础设施正在从"给人用的"变成"给Agent用的"。传统的后端平台(Supabase、Vercel、AWS)是为人类开发者设计的——有图形界面、有文档网站、有CLI工具。而InsForge是为AI Agent重新设计的——MCP优先、Agent自学文档、最小化人类操作路径。

现在就能做的事

  1. 10分钟内跑通Demogit clonedocker compose up → Agent连接MCP → 让它建个简单的CRUD应用
  2. 把现有项目的后端迁移到InsForge:先迁移非关键的开发环境,验证Agent在InsForge上的工作效率是否真的高于拼凑方案
  3. 关注InsForge的安全功能路线图:动态权限和可逆操作上线后,就可以放心给Agent更大的权限范围

GitHub仓库:github.com/InsForge/InsForge(Apache 2.0开源) 官方文档:docs.insforge.dev Discord社区:discord.com/invite/MPxwj5xVvW


⚠️ 风险提示:InsForge目前处于快速迭代期,API可能变动。给Agent生产环境权限前,务必先在隔离环境中充分测试。Model Gateway的速率限制功能刚上线(2026-05-19),建议先小流量验证稳定性。Compute模块(长运行容器)仍处于Private Preview,不建议用于生产负载。

#AI创业 #Agent工坊 #InsForge #MCP协议 #AI编程 #开源工具 #一人公司

本文由AI辅助创作,经人工审核编辑发布